
As an Amazon Associate I earn from qualifying purchases.
Swapping your dim, yellowish halogen H11 headlight or fog light bulbs for modern LEDs is one of the most popular DIY automotive upgrades — and for good reason. LED bulbs promise dramatically better visibility, longer lifespan, and lower power draw. But the upgrade isn’t always as simple as “plug and play.” Incorrect orientation, poor heat management, and fitment issues can turn a 15-minute job into a frustrating ordeal — or worse, create dangerous glare for oncoming drivers. This guide walks you through every step of a proper H11/H9/H8 LED bulb installation, drawing on manufacturer specifications and verified owner feedback to help you get it right the first time.
Best for: DIY drivers upgrading halogen headlights or fog lights for better nighttime visibility
What You Need Before You Start
Before you open any packaging, gather these items and verify a few things:
- Your vehicle’s owner’s manual — Confirm that your headlights or fog lights use the H11 bulb type. The H11, H9, and H8 share the same L-shaped, two-pin base (known as PGJ19-2 / PGJ19-5), which is why many LED bulbs are marketed as “H11/H9/H8 compatible.” However, the wattage and tab notch positions differ slightly between the three, so check your manual or the markings on your existing bulb.
- Nitrile or cotton gloves — Even though LED bulbs aren’t as heat-sensitive as halogens, clean gloves keep oils off the housing and give you a better grip in tight engine bays.
- A small flathead screwdriver or trim removal tool — Some vehicles have dust covers, retaining clips, or wiring harness locks that need gentle prying.
- A headlight aiming tool or a flat wall — You’ll need to verify beam alignment after installation. A flat garage wall 25 feet away works fine.
- Patience and good lighting — A headlamp or work light makes a big difference when you’re reaching behind a headlight assembly.
Important safety note: Always turn off your vehicle and headlights before removing or installing any bulb. Let existing halogen bulbs cool for at least 10 minutes — they get extremely hot.
Step 1: Access the Headlight or Fog Light Housing
This step varies the most from vehicle to vehicle. In many cars and trucks, you can reach the back of the headlight assembly directly from the engine bay by opening the hood. Look for a round dust cover (rubber or plastic) or a twist-lock cap behind the headlight lens.
Common access scenarios:
- Direct engine-bay access: Simply pop the hood, locate the back of the headlight housing, and remove the dust cover by twisting it counterclockwise or pulling it off.
- Wheel-well access (fog lights): Many fog lights are accessed by turning the steering wheel to one side, then removing a few clips from the wheel-well liner to reach behind the bumper.
- Battery or air-box obstruction: On some vehicles (many Hondas, Toyotas, and Subarus), the battery or air intake box partially blocks the driver-side headlight. You may need to remove the air box or loosen the battery bracket for clearance.
- Full headlight assembly removal: A few vehicles (certain Audis, BMWs) require removing the entire headlight assembly. Consult a model-specific forum or your service manual if this applies to you.
If you’re comfortable working on your own vehicle, you might also appreciate our guide to the MODARI Portable Tire Inflator — another handy DIY automotive tool.
Step 2: Remove the Old Halogen Bulb
Once you can see and reach the back of the headlight housing:
1. Disconnect the electrical connector. Press the release tab on the wiring harness plug and pull it straight off the bulb’s base. Don’t yank the wires — grip the connector body. 2. Unlock the bulb. H11-type bulbs lock into the housing with a quarter-turn bayonet mechanism. Rotate the bulb counterclockwise (about 15–30 degrees) until you feel it release. 3. Pull the bulb straight out. It should slide out easily. Set it aside on a clean surface — keep it as a backup.
Pro tip from verified owners: Take a photo of the old bulb’s orientation before removing it. The alignment tabs on an H11 base have a specific “clock position” that determines where the filament (or LED chips) sit relative to the reflector. Getting this wrong is the single most common installation mistake.
Step 3: Inspect the New LED Bulb
Before inserting the new bulb, take a moment to understand its design. We’ll use the SEALIGHT H11/H9/H8 LED as our reference product, since it’s a popular choice with a design representative of most modern H11 LEDs.

SEALIGHT H11/H9/H8 LED Bulbs — Detailed Review
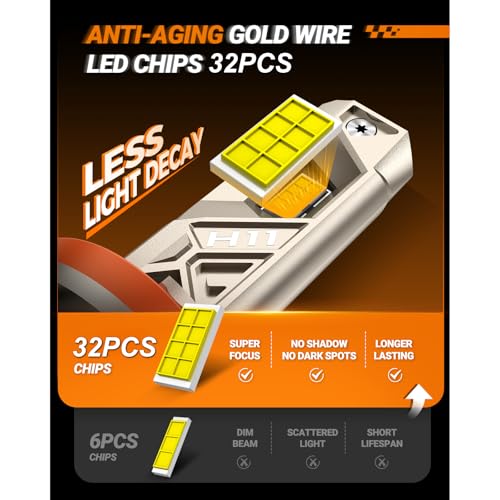
The SEALIGHT H11/H9/H8 LED bulb is built around 32 lighting chips arranged on two sides of a flat aluminum heat-sink body, which is the standard layout for LED headlight bulbs designed to mimic the light-emission pattern of a halogen filament. SEALIGHT advertises an output of 96,000 lumens (per pair), though it’s worth noting that this figure likely represents raw LED output rather than effective lumens after thermal management and housing losses — a common marketing practice across the LED bulb industry. What matters more is the real-world brightness improvement, and verified owners consistently report a dramatic upgrade over stock halogens.
The bulb features an IP68 waterproof rating and a built-in cooling fan with an advertised lifespan of over 80,000 hours. The compact form factor is one of its strongest selling points: many owners report that it fits behind dust covers and inside tight housings where bulkier LED bulbs with external drivers won’t work. The base uses the standard H11 bayonet lock, and the bulb is marketed as compatible with H11, H9, and H8 sockets.
What verified reviewers commonly praise:
- Significant brightness improvement over halogen — many describe it as “night and day”
- Easy installation that takes 10–15 minutes per bulb
- Compact size that fits most housings without dust-cover modification
- Clean white light color (typically around 6000–6500K)
What verified reviewers commonly criticize:
- Some vehicles trigger a dashboard “bulb out” warning (CANBUS error) because LEDs draw less power than halogens. This isn’t a defect — it’s a vehicle-side issue that may require an external CANBUS decoder.
- A small percentage of owners report the fan being audible in very quiet cabins, though most say it’s inaudible with the hood closed.
- Beam pattern quality varies by vehicle — in projector housings, results are generally excellent; in older reflector housings, some owners note more scatter than ideal.
Who should buy this: Drivers looking for a straightforward, affordable halogen-to-LED upgrade for H11/H9/H8 headlights or fog lights. It’s particularly well-suited for vehicles with projector-style headlight housings, where the projector lens controls the beam cutoff.
Step 4: Insert the LED Bulb
This is where careful attention to orientation pays off:
1. Identify the LED chip orientation. On most H11 LED bulbs (including the SEALIGHT), the LED chips are mounted on two flat sides of the bulb body. These chips need to be positioned at roughly 3 o’clock and 9 o’clock (horizontal) when viewed from behind the housing. This mimics the position of the halogen filament and ensures the reflector or projector lens produces a proper beam pattern.
2. Align the base tabs. The H11 base has alignment tabs (small notches and a locating lug). Line these up with the corresponding slots in the headlight housing.
3. Insert and twist. Slide the bulb straight into the housing, then rotate it clockwise (about 15–30 degrees) until it clicks and locks into place. You should feel a positive “snap.”
4. Reconnect the electrical connector. Push the wiring harness plug onto the bulb’s pins until it clicks. It should only fit one way.
5. Replace the dust cover. If your vehicle has a rubber or plastic dust cover, make sure it seats fully. If the LED bulb’s heat sink or fan housing is too long for the cover to close, you may need an extended dust cover (some LED bulb manufacturers sell these separately, or universal silicone covers are available).
What If the Bulb Won’t Lock In?
This is one of the most frequently reported issues in owner forums. Here’s what to check:
- Wrong rotation direction. It’s counterintuitive, but some housings require you to push in and rotate in the opposite direction from what you’d expect. Try both.
- Tab alignment. The H11, H9, and H8 bases have slightly different tab configurations. While most LED bulbs marketed as “H11/H9/H8” use a universal base, a few vehicles have tighter tolerances. Some owners report needing to gently file a small tab for a perfect fit.
- Aftermarket housing interference. If you have aftermarket headlight assemblies, the socket dimensions may differ slightly from OEM.
Step 5: Test Before Reassembling
Before you put everything back together:
1. Turn on your headlights (low beam). 2. Verify that both bulbs illuminate. 3. Check for any dashboard warning lights (CANBUS errors). 4. Look at the beam pattern on a wall or garage door from about 25 feet away.
If one bulb doesn’t light up, the most common fix is simple: flip the connector 180 degrees. LED bulbs are polarity-sensitive, and some H11 connectors can be plugged in either way. Reversing the plug corrects the polarity.
Step 6: Aim Your Headlights
This step is critical and often skipped. Improperly aimed headlights — especially brighter LED ones — create dangerous glare for oncoming traffic and can get you pulled over in some jurisdictions.
The Wall-Aiming Method
1. Park your vehicle on a flat surface, 25 feet from a flat wall or garage door. 2. Turn on your low beams. 3. You should see a distinct horizontal cutoff line. The center of each beam’s “hot spot” should be:
- Vertically: At or slightly below the center height of your headlight lens.
- Horizontally: Directly in front of each headlight, not crossed.
4. Most headlight housings have vertical and horizontal adjustment screws accessible from the engine bay. Use a Phillips screwdriver or 4mm socket to make small adjustments.
Key insight from owner feedback: Many drivers who complain about LED bulbs “blinding oncoming traffic” simply haven’t re-aimed their headlights after installation. The slightly different focal point of an LED chip versus a halogen filament can shift the beam pattern enough to cause glare, even if the bulb is correctly oriented.
For other vehicle maintenance projects, check out our Dodge Charger Scat Pack maintenance guide for long-term performance tips.
Step 7: Reassemble and Final Check
1. Secure all dust covers, clips, and fasteners you removed. 2. If you removed a wheel-well liner (for fog lights), reinstall all push-pin clips. 3. Drive the vehicle at night in a safe area and evaluate the beam pattern from the driver’s seat. 4. Have someone stand in front of the vehicle (at a safe distance, with the car in park) to confirm the low-beam cutoff isn’t too high.
Common H11 LED Installation Mistakes to Avoid
| Mistake | Consequence | Fix |
|---|---|---|
| LED chips oriented vertically instead of horizontally | Poor beam pattern, excessive glare | Rotate bulb 90° in the housing |
| Dust cover not fully sealed | Moisture intrusion, foggy headlight lens | Use extended dust cover or silicone boot |
| Skipping headlight aiming | Blinding oncoming drivers | Use the 25-foot wall method |
| Ignoring CANBUS errors | Annoying dashboard warning, possible hyper-flash | Install a CANBUS decoder/resistor |
| Touching LED chips with bare fingers | Oil residue can cause hot spots over time | Wipe with isopropyl alcohol |
| Forcing a bulb that won’t lock | Broken housing tabs | Check tab alignment; don’t force it |
Will H11 LEDs Work in My Vehicle?
The H11 is one of the most common automotive bulb types, used in hundreds of vehicles for low beams, fog lights, or both. However, “will it fit” and “will it work well” are two different questions:
- Projector housings: LED bulbs generally perform best in projector-style headlights, which use a lens and a physical shutter to create a sharp beam cutoff. The SEALIGHT and similar bulbs tend to produce excellent results in these housings.
- Reflector housings: Results are more variable. The reflector bowl is designed around the specific light-emission geometry of a halogen filament. LED chips don’t emit light in exactly the same pattern, which can cause more scattered light and less defined beam edges. Many owners still report a worthwhile improvement, but the beam pattern may not be as crisp.
- Sealed-beam or specialty housings: Some older vehicles use sealed-beam headlights that aren’t compatible with bulb-only replacements.
If you’re working on other vehicle electrical projects, our NOCO Boost GB40 beginner guide covers another essential piece of automotive gear.
A Note on Legality
LED headlight bulbs installed in housings designed for halogen bulbs exist in a legal gray area in many jurisdictions. In the United States, the DOT has not approved aftermarket LED replacement bulbs for on-road use in halogen housings (as of early 2026). In practice, enforcement varies widely. Many states focus on whether headlights are properly aimed and not causing glare rather than the specific bulb technology. Always check your local regulations.
Product Recommendation
Frequently Asked Questions
How long does it take to install H11 LED bulbs? Most owners report 10–20 minutes per bulb, depending on how accessible the headlight housing is. Vehicles with obstructed access (battery in the way, etc.) may take longer.
Do I need to modify my wiring? No. H11 LED bulbs are designed as direct replacements that use the existing H11 connector. However, if your vehicle’s CANBUS system throws a “bulb out” error, you may need to add an inline resistor or CANBUS decoder module.
Will LED bulbs damage my headlight housing? Quality LED bulbs with proper thermal management (like fan-cooled designs) typically run cooler than halogen bulbs and should not damage housings. However, very cheap LED bulbs with poor heat dissipation could potentially cause issues over time.
Can I use H11 LED bulbs in fog lights too? Yes. The H11 socket is commonly used for both headlights and fog lights. The installation process is the same, though accessing fog light housings often requires going through the wheel well or under the bumper.
What color temperature should I choose? Most H11 LED bulbs, including the SEALIGHT, produce light in the 6000–6500K range (cool white). This provides excellent contrast and visibility. Some drivers prefer a slightly warmer 4300–5000K for better performance in rain and fog, but fewer options are available in that range.
How We Research
This guide was developed by synthesizing manufacturer specifications, product documentation, and verified customer and expert reviews from multiple sources. We did not personally install, test, or handle the products discussed. Our goal is to provide an honest, well-sourced walkthrough that reflects real-world owner experiences and manufacturer guidance. All claims about product performance are attributed to manufacturer specs or the general consensus of verified purchaser feedback. We believe transparent, well-researched curation serves readers better than fabricated hands-on claims.


Leave a Reply