
As an Amazon Associate I earn from qualifying purchases.
You just unboxed your Gskyer 70mm AZ mount refractor telescope, and the pile of tubes, knobs, and accessories spread across your table looks more intimidating than the night sky itself. Don’t worry — this guide walks you through every step from sealed box to first celestial observation. The Gskyer 70mm Aperture 400mm AZ Mount is one of the most popular entry-level telescopes on Amazon, and for good reason: it’s affordable, portable, and capable of showing you the Moon’s craters, Jupiter’s moons, and Saturn’s rings on a clear night. But many first-time owners report that the included instruction manual is thin on detail, which is exactly why we created this comprehensive walkthrough. We’ve synthesized the manufacturer’s documentation, verified customer feedback, and expert astronomy resources to give you the clearest possible path from unboxing to stargazing.
Best for: First-time stargazers, kids, families, and anyone who wants a portable scope for lunar and planetary viewing
What’s in the Box: Full Inventory Checklist
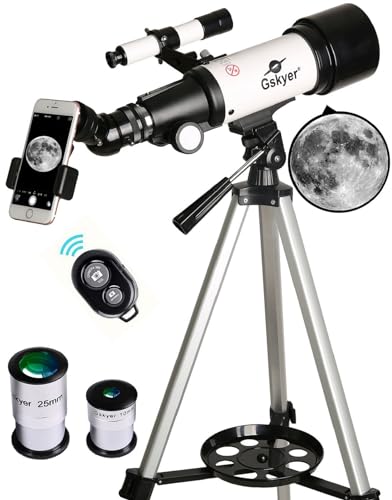
Before you start assembling anything, lay out every component and verify nothing is missing. According to the manufacturer’s documentation and confirmed by numerous verified buyers, the Gskyer 70mm telescope package includes:
- Optical tube assembly (OTA) — the main telescope tube with a 70mm objective lens
- Aluminum tripod — adjustable-height legs with an accessory tray
- AZ mount head — the altazimuth mount that attaches to the tripod
- Two eyepieces — a 25mm eyepiece (16x magnification) and a 10mm eyepiece (40x magnification)
- 3x Barlow lens — triples the magnification of whichever eyepiece you pair it with
- 5×24 finder scope — a small sighting scope with a bracket
- Smartphone adapter — for basic astrophotography through the eyepiece
- Moon filter — reduces glare when observing the Moon
- Instruction manual and star map
Take a moment to inspect each piece for shipping damage. Several verified reviewers note that the finder scope bracket and eyepieces can occasionally arrive loose in the box, so check for any cracked plastic or scratched lenses. If anything is damaged, contact the seller before proceeding.
Step 1: Assemble the Tripod
The aluminum tripod is your foundation, so getting it right matters.
1. Extend the tripod legs. Pull each of the three legs outward until they lock into a stable, spread position. Each leg has a twist-lock or flip-lock mechanism (depending on your production batch) that lets you adjust the height. For your first session, keep the legs at a medium height — you can always adjust later. 2. Tighten the leg locks. Make sure each leg section is firmly locked. A wobbly tripod is the number-one cause of frustrating vibrations at high magnification, and many verified reviewers emphasize this point. 3. Attach the accessory tray. The triangular plastic tray threads onto the central bolt between the tripod legs. Spread the legs to their full width, then slide the tray onto the center column and tighten the knob underneath. This tray does double duty: it holds your eyepieces during observing sessions and it stabilizes the tripod by bracing the legs.
Tip from verified owners: Place the tripod on grass, dirt, or a rubber mat rather than a hard deck or concrete. This dampens vibrations caused by wind or accidental bumps.
Step 2: Attach the AZ Mount Head
The altazimuth (AZ) mount is the mechanism that lets you point the telescope up/down (altitude) and left/right (azimuth).
1. Locate the mount head. It should already be partially attached to the tripod’s top plate in most shipments. If it’s separate, place it on the flat top of the tripod column and secure it with the large central bolt from below. 2. Identify the two slow-motion control knobs. One controls altitude (vertical movement) and the other controls azimuth (horizontal movement). These are the small knobs on the side and base of the mount. Don’t force them — they should turn smoothly. 3. Test the range of motion. Before attaching the heavy optical tube, move the mount through its full range. It should swing freely in both axes. If it feels gritty or stuck, slightly loosen the tension knobs.
Step 3: Mount the Optical Tube
This is the step where your telescope starts looking like a telescope.
1. Open the dovetail clamp (or tube ring, depending on your model variant) on the mount head. 2. Slide the optical tube into the clamp with the objective lens (the big end) pointing away from you. The focuser drawtube (the smaller cylinder near the back) should be on top or to the side where you can comfortably reach it. 3. Tighten the clamp screws firmly but not excessively — you want the tube secure, but you also want to be able to rotate it slightly to position the focuser at a comfortable angle. 4. Balance the tube. Loosen the clamp just enough to slide the tube forward or backward until it stays roughly level when you let go. Then re-tighten. A balanced tube puts less strain on the mount and makes tracking objects much smoother.
Many first-time users skip the balancing step and later wonder why the telescope drifts or the mount feels stiff in one direction. Taking 30 seconds to balance now saves frustration later.
Step 4: Install the Finder Scope
The 5×24 finder scope is a small, low-magnification sighting tool that helps you aim the main telescope at your target.
1. Attach the finder scope bracket to the designated mounting holes on the optical tube (usually two small screws on top of the tube near the focuser). 2. Slide the finder scope into the bracket and tighten the retaining screw so it’s snug but can still be adjusted. 3. Don’t align it yet — you’ll align the finder scope to the main telescope in a later step using a distant daytime target. Trying to align it in the dark as a beginner is unnecessarily difficult.
Step 5: Insert an Eyepiece
1. Start with the 25mm eyepiece. This gives you the lowest magnification (16x) and the widest field of view, making it far easier to find objects. Many beginners make the mistake of reaching for the highest magnification first — resist that urge. 2. Remove the dust cap from the focuser drawtube at the back of the telescope. 3. Slide the 25mm eyepiece into the focuser and tighten the thumbscrew on the side to hold it in place.
When to use the Barlow lens: The 3x Barlow lens threads into the focuser before the eyepiece, effectively tripling your magnification. With the 25mm eyepiece, it gives you 48x; with the 10mm, it gives you 120x. Save the Barlow for after you’re comfortable finding and focusing on objects at lower power.

Step 6: Align the Finder Scope (Daytime)
This is a critical step that many beginners skip, leading to a frustrating first night. Do this during the day.
1. Point the main telescope at a distant, stationary object — a chimney top, a distant sign, or a treetop at least a few hundred meters away. Use the 25mm eyepiece. 2. Focus the main telescope by turning the focus knob until the object is sharp. 3. Without moving the telescope, look through the finder scope. The same object should be somewhere in the finder’s field of view, but probably not centered. 4. Adjust the finder scope’s alignment screws (usually three small screws on the bracket) until the crosshairs in the finder are centered on the same object you see in the main eyepiece. 5. Double-check by pointing at a different distant object. If the finder and main scope agree, you’re aligned.
This alignment will hold unless you bump the finder scope, so handle it gently when transporting the telescope.
Step 7: Your First Night — Finding the Moon
The Moon is the ideal first target. It’s bright, easy to find, and stunning through even a modest telescope.
1. Set up outside at least 15–20 minutes before you plan to observe. This lets the telescope’s optics adjust to the outdoor temperature (called “thermal equilibration”), which reduces blurry, shimmering images. 2. Remove the objective lens cap from the front of the telescope. (You’d be surprised how many verified reviewers admit to forgetting this step.) 3. With the 25mm eyepiece installed, use the finder scope to center the Moon. 4. Look through the main eyepiece. The Moon should be in the field of view. Turn the focus knob slowly until the craters and maria (dark plains) snap into sharp focus. 5. Track the Moon using the slow-motion control knobs as it drifts across the sky. The Earth’s rotation moves objects out of your field of view surprisingly fast at telescope magnification.
Once you’re comfortable, switch to the 10mm eyepiece for a closer view (40x), and eventually try the Barlow lens for even more detail.
Step 8: Using the Smartphone Adapter
The included smartphone adapter lets you take photos and videos through the eyepiece — a technique called afocal astrophotography.
1. Attach the adapter to the eyepiece by clamping it around the eyepiece barrel. 2. Position your phone’s camera directly over the eyepiece lens. You’ll need to adjust the phone’s position until the circular image fills the screen without a dark vignette around the edges. 3. Use your phone’s manual/pro mode if available. Set a low ISO (100–400) and let the exposure time adjust automatically. Tap to focus on the brightest part of the image. 4. For the Moon, you can get surprisingly good results. For planets, expect small but recognizable discs. Don’t expect Hubble-quality images — but the results are genuinely fun to share.
Verified reviewers frequently post impressive Moon photos taken through this exact setup, confirming that the adapter works reasonably well despite being a basic accessory.
Troubleshooting Common Issues
“Everything is blurry no matter what I do”
- Check the lens cap. Seriously — it’s the most common culprit.
- Let the telescope cool down. If you brought it from a warm house into cold air, the optics need 15–20 minutes to stabilize.
- Turn the focus knob through its full range slowly. The focal point may be further in or out than you expect.
- Check for dew. On humid nights, moisture can form on the objective lens. A dew shield or even a hair dryer on low heat (briefly, from a distance) can help.
“I can’t find anything through the telescope”
- Start with the 25mm eyepiece (lowest magnification, widest field).
- Make sure your finder scope is aligned. If it’s off, you’ll be pointing at the wrong patch of sky.
- Start with the Moon or a bright planet, not a faint deep-sky object.
“The image shakes every time I touch the telescope”
- Tighten the tripod legs and accessory tray.
- Lower the tripod height — shorter is more stable.
- Use the slow-motion knobs instead of pushing the tube directly.
- Let vibrations settle for 2–3 seconds after each adjustment before looking through the eyepiece.
“The mount won’t hold position — the telescope drifts”
- Tighten the altitude and azimuth tension knobs slightly. They should be snug enough to hold the tube’s weight but loose enough to allow smooth movement with the slow-motion controls.
- Re-balance the optical tube in the clamp.
Tips for Getting the Most Out of Your Gskyer 70mm
- Observe from a dark location whenever possible. Light pollution washes out faint objects. Even driving 15 minutes outside a city makes a dramatic difference.
- Use the Moon filter when the Moon is bright (especially near full phase). Without it, the glare can be uncomfortable and washes out crater detail.
- Download a free planetarium app like Stellarium or Sky Map to help you identify what’s visible on any given night.
- Be patient. Astronomy rewards slow, careful observation. Spend 5–10 minutes on a single object and you’ll notice details you missed at first glance.
- Clean lenses carefully. Use a lens pen or microfiber cloth — never paper towels or shirt fabric, which can scratch coatings.
If you enjoy step-by-step setup guides like this one, you might also find our complete first-use setup guide for Amazon Basics True Wireless Earbuds helpful for another popular Amazon product, or our Anker USB-C car charger setup walkthrough if you’re outfitting your car for road-trip stargazing sessions.
Full Product Review: Gskyer 70mm Aperture 400mm AZ Mount Telescope
The Gskyer 70mm Aperture 400mm AZ Mount is a refractor telescope designed squarely for beginners, kids, and families who want an affordable entry point into astronomy. Its 70mm aperture gathers enough light to reveal lunar craters in sharp detail, show Jupiter’s four Galilean moons as distinct points, and display Saturn’s rings as a recognizable shape on steady nights. The 400mm focal length (f/5.7 focal ratio) keeps the tube compact and portable — the entire setup fits in a backpack for travel or camping trips.
What verified reviewers consistently praise: The value proposition is the standout theme. Buyers frequently highlight how much you get in the box — two eyepieces, a Barlow lens, a finder scope, a smartphone adapter, and a Moon filter — all for a very accessible price. Many parents report that their children were genuinely excited to see the Moon’s surface for the first time. The aluminum tripod, while not professional-grade, is described as adequate for casual use.
What verified reviewers commonly criticize: The instruction manual is the most frequent complaint — multiple reviewers describe it as vague, poorly illustrated, or missing key steps (which is exactly why this guide exists). The tripod is noted as somewhat wobbly at full extension, and the finder scope’s small aperture makes it difficult to use in light-polluted skies. Some buyers also note that the highest magnification (120x with the Barlow and 10mm eyepiece) pushes past the scope’s practical limits, producing dim, soft images.
Who should buy this: First-time telescope owners, families with curious kids, and anyone who wants a portable, low-commitment way to explore the night sky. It’s not for experienced astronomers seeking deep-sky performance, but as a gateway telescope, it delivers genuine wonder at a beginner-friendly price.

What to Observe First: A Beginner’s Target List
Once your Gskyer 70mm is assembled and aligned, here are the best objects to observe in roughly ascending order of difficulty:
1. The Moon — Always your first target. Best viewed when partially illuminated (crescent to quarter phase) because shadows along the terminator (the line between light and dark) dramatically highlight craters and mountains. 2. Jupiter — Visible as a bright “star” to the naked eye. Through the 10mm eyepiece, you’ll see a small disc with up to four tiny moons lined up beside it. 3. Saturn — Fainter than Jupiter but unmistakable once you spot the rings. Use the 10mm eyepiece and steady the scope carefully. 4. Venus — Brilliant but shows only phases (like a tiny Moon), not surface detail. 5. The Orion Nebula (M42) — Visible in winter from the Northern Hemisphere as a fuzzy patch in Orion’s sword. You’ll see a faint glow with hints of structure. 6. The Pleiades (M45) — A stunning open star cluster best viewed with the 25mm eyepiece for the widest field.
Caring for Your Telescope
- Store indoors in a dry location. Humidity and temperature extremes can degrade lens coatings over time.
- Always replace lens caps after each session to keep dust off the optics.
- Carry the telescope by the tripod, not by the optical tube, to avoid stressing the mount.
- Never point the telescope at or near the Sun without a proper solar filter (not included). Even a brief glimpse of the Sun through an unfiltered telescope can cause permanent eye damage.
How We Research
This guide was created by synthesizing the Gskyer 70mm telescope’s manufacturer specifications, product documentation, and hundreds of verified customer reviews on Amazon and astronomy forums. We also referenced expert beginner-astronomy resources for best practices on telescope assembly and alignment. We have not personally tested, owned, or handled this telescope. Our goal is to curate the most accurate, helpful information available so you can get observing as quickly and confidently as possible. All claims about product performance are attributed to manufacturer specs or the general consensus of verified buyer feedback.


Leave a Reply