
As an Amazon Associate I earn from qualifying purchases.
You just unboxed the PETLIBRO Automatic Cat Feeder with Camera — a smart feeder that pairs 1080P HD video (with night vision) and dual-band WiFi so you can watch and feed your cat from anywhere. But between the app download, WiFi pairing, hopper assembly, and camera configuration, the first 30 minutes can feel overwhelming. This guide walks you through every step, from peeling off the protective film to scheduling your cat’s first automated meal, drawing on PETLIBRO’s own documentation and the collective wisdom of thousands of verified buyers.
Best for: Cat owners who work away from home and want scheduled meals plus real-time video check-ins
What’s in the Box
Before you start, lay everything out and make sure nothing is missing. According to PETLIBRO’s packaging documentation, you should find:
- Main feeder unit (base with integrated camera lens at the top)
- Food hopper / lid (translucent container that holds up to roughly 5 liters of dry kibble)
- Stainless-steel bowl insert (sits inside the plastic tray at the base)
- Food separator / desiccant bag holder (keeps kibble fresh inside the hopper)
- USB-C power adapter and cable
- Quick-start guide and user manual
Give the stainless-steel bowl and the plastic tray a quick wash with warm soapy water and dry them thoroughly before first use. Many verified buyers recommend also wiping down the inside of the hopper to remove any factory dust.
Step 1: Physical Assembly
Attach the Bowl and Tray
Slide the stainless-steel bowl into the plastic tray, then seat the tray onto the base of the feeder. It should click or rest snugly in place. The tray is designed to be removable for easy cleaning.
Fill and Seat the Hopper
Remove the hopper lid, pour in your cat’s dry kibble (the manufacturer specifies dry food between 2–15 mm in diameter), and snap the lid back on. Place the filled hopper onto the base unit, aligning the guides. You should feel it lock into position. The built-in desiccant bag holder sits inside the hopper — drop in a food-safe desiccant packet (one is usually included) to help keep kibble from going stale.
Plug In
Connect the USB-C cable to the port on the back of the feeder, then plug the adapter into a wall outlet. The feeder should power on automatically — you’ll hear a short chime or see a status light near the camera lens. PETLIBRO notes that this feeder does not have a built-in battery backup for dispensing, so it must remain plugged in for scheduled meals to work. Some owners keep the feeder on a small UPS for peace of mind during power outages.

Step 2: Download and Set Up the PETLIBRO App
The feeder is controlled entirely through the PETLIBRO app, available on both iOS (App Store) and Android (Google Play). Search for “PETLIBRO” and download the official app — look for the orange paw-print icon.
1. Create an account — you can register with an email address or phone number. Confirm via the verification code sent to you. 2. Tap the “+” icon on the home screen to add a new device. 3. Select the correct model — look for the camera feeder (often listed as “Granary Camera Feeder” or a similar name in the app’s device catalog). Choosing the wrong model is a common early mistake that causes pairing failures, according to user reports.
Step 3: WiFi Pairing
This is the step where most new owners hit a snag, so read carefully.
Dual-Band Support (5 GHz and 2.4 GHz)
One of this feeder’s standout features is dual-band WiFi — it supports both 5 GHz and 2.4 GHz networks. Many competing smart feeders only work on 2.4 GHz, which forces owners to split their network or create a separate SSID. With this PETLIBRO model, you can connect to whichever band your router broadcasts.
That said, verified reviewers note a few important caveats:
- Combined / merged SSIDs work, but if you experience trouble, temporarily separate your 2.4 GHz and 5 GHz bands in your router settings, pair the feeder, and then re-merge.
- The feeder must be within reasonable WiFi range. If your feeding station is in a far corner of the house, a WiFi extender may help.
- Special characters in your WiFi password (like `#`, `&`, or spaces) have caused pairing failures for some users. If pairing stalls, try temporarily simplifying your password.
The Pairing Process
1. Make sure the feeder is powered on and showing a blinking indicator light (this means it’s in pairing mode). If the light is solid, press and hold the reset button on the back for about 5 seconds until it starts blinking. 2. In the app, confirm your WiFi network name and enter the password. 3. The app will generate a QR code on your phone screen. 4. Hold your phone screen about 6–8 inches in front of the feeder’s camera lens. The camera reads the QR code to receive your WiFi credentials. You’ll hear a confirmation tone when it’s scanned successfully. 5. Wait 15–30 seconds for the feeder to connect to your network. The indicator light should turn solid, and the app will confirm the device has been added.
Troubleshooting tip: If the QR code scan fails, try adjusting your phone’s screen brightness to maximum and reducing ambient glare. Several reviewers report that scanning in a dimly lit room actually works better because there’s less reflection on the phone screen.
If you’ve previously set up a non-camera PETLIBRO feeder, you may find this walkthrough familiar — the app flow is similar to the one covered in our PETLIBRO auto cat feeder setup guide, though the camera model adds the QR-code scanning step and video configuration.
Step 4: Create Your Cat’s Profile
Once the feeder is online, the app will prompt you to create a pet profile. This is optional but useful — it lets you track feeding history per pet and customize the app dashboard. Enter your cat’s name, weight, and age. If you have multiple cats sharing the feeder, you can add more than one profile, though the feeder itself dispenses into a single bowl.
Step 5: Schedule Meals
This is the core functionality, and PETLIBRO makes it fairly straightforward.
1. Tap the feeder on your app home screen to open its control panel. 2. Navigate to “Feeding Plan” (or “Schedule” depending on app version). 3. Tap “Add Meal” and set the time. You can schedule up to 10 meals per day, according to PETLIBRO’s documentation. 4. Set the portion size. Each “portion” is roughly 1/12 cup (about 8–10 grams, though this varies by kibble size and shape). You can assign 1–50 portions per meal. Start conservatively — many owners report that the actual amount dispensed can vary slightly depending on kibble density. 5. Repeat for each meal you want to automate. 6. Enable the schedule by toggling it on.
Manual Feeding
You can also dispense food on demand by tapping the “Feed” button in the app. This is handy for treat time or if your cat is giving you that look through the camera.
Portion Calibration Tips
Verified buyers frequently mention that portion accuracy depends heavily on kibble size. Smaller kibble (like many indoor-formula brands) tends to dispense more per portion than larger kibble. PETLIBRO suggests running a few test portions into the bowl and weighing the result with a kitchen scale so you can dial in the exact amount your cat needs. This is one of the most commonly repeated tips across user reviews.
Step 6: Configure the Camera
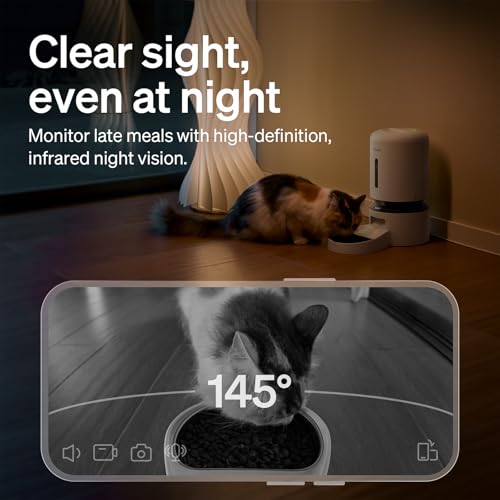
The built-in 1080P HD camera with night vision is one of the main reasons people choose this model over PETLIBRO’s non-camera feeders.
Live View
Open the feeder in the app and tap the camera/video icon. You should see a live stream from the feeder’s wide-angle lens. The camera points outward from the top of the unit, giving you a view of the bowl area and the surrounding space.
Night Vision
Night vision activates automatically in low-light conditions using infrared LEDs. You don’t need to toggle anything — the camera switches to grayscale IR mode on its own. Reviewers generally praise the night-vision quality as clear enough to see your cat eating in a dark kitchen.
Two-Way Audio
The feeder has a built-in microphone and speaker. In the live-view screen, you’ll find a microphone button that lets you talk to your cat (or startle them off the counter). You can also listen in. Many owners use this feature to call their cat to the feeder at mealtime.
Video Recording and Snapshots
From the live-view screen you can:
- Take a snapshot — saves a still image to your phone’s camera roll.
- Record a clip — captures video directly to your phone.
- Motion detection alerts — enable these in the camera settings to receive push notifications when the camera detects movement near the feeder. This is useful for confirming your cat actually ate, but some reviewers warn that it can be overly sensitive and generate frequent alerts if the feeder is in a high-traffic area. Adjusting the sensitivity slider usually helps.
Video Quality and Bandwidth
The 1080P stream looks sharp on a phone screen, according to the majority of reviewers. However, a few users on slower internet connections report occasional lag or reduced resolution. If you experience buffering, try switching the feeder to your 5 GHz band (which typically has more bandwidth) or moving your router closer.
Step 7: Customize Notifications and Settings
Dive into the feeder’s settings menu in the app to fine-tune your experience:
- Low-food alert — notifies you when the hopper is running low. Essential if you travel and have a pet sitter refilling.
- Feeding complete notification — confirms each scheduled meal was dispensed.
- Do Not Disturb mode — silences the feeder’s speaker during certain hours (useful if the dispensing motor noise bothers light sleepers).
- Voice recording — you can record a short voice message that plays automatically each time food is dispensed. Many cat owners record themselves calling their cat’s name so the cat associates the sound with mealtime.
Common Issues and Fixes
Based on patterns in verified customer reviews, here are the most frequently reported issues and their solutions:
| Problem | Likely Cause | Fix |
|---|---|---|
| Feeder won’t enter pairing mode | Not properly reset | Hold reset button 5+ seconds until light blinks |
| QR code won’t scan | Screen glare or low brightness | Max brightness, dim room, hold phone steady at 6–8 inches |
| WiFi disconnects frequently | Weak signal or router compatibility | Move feeder closer to router or add a WiFi extender |
| Portions seem inconsistent | Kibble size variation | Weigh test portions and adjust the count in the app |
| Camera feed is laggy | Bandwidth congestion | Switch to 5 GHz band; close other streaming apps |
| Food jams in the dispenser | Kibble too large or irregularly shaped | Use kibble within the 2–15 mm recommended range |
| Night vision not activating | Ambient light confusing the sensor | Ensure the area is actually dark; check for nearby LED lights |
If you enjoy setting up smart home gadgets, you might also appreciate our walkthrough for smart home gifts for tech lovers, which covers other connected devices that pair well with a smart pet-care setup.
Maintenance and Cleaning
PETLIBRO recommends regular cleaning to keep the feeder hygienic:
- Stainless-steel bowl and plastic tray — wash every few days with warm soapy water.
- Hopper — empty and wash weekly, especially in humid climates. Dry completely before refilling.
- Dispensing mechanism — wipe down the chute area with a damp cloth to remove kibble dust. Do not submerge the base unit.
- Camera lens — gently wipe with a soft, dry cloth if the image looks hazy.
The base unit (which contains the motor, camera, and electronics) should never be submerged in water. Spot-clean only.
Detailed Product Review
PETLIBRO Automatic Cat Feeder with Camera (1080P HD, 5 GHz / 2.4 GHz WiFi)
The PETLIBRO 1080P WiFi Camera Feeder combines automated portion-controlled feeding with a full-featured pet camera in a single countertop device. According to manufacturer specs, it supports both 5 GHz and 2.4 GHz WiFi — a genuine advantage over many competitors that are limited to 2.4 GHz only. The 1080P camera with automatic night vision, two-way audio, and motion-detection alerts effectively replaces the need for a separate pet camera pointed at the food bowl.
What verified reviewers commonly praise: The dual-band WiFi connectivity is frequently highlighted as a major convenience, eliminating the router-configuration headaches common with 2.4 GHz-only devices. The camera quality is generally described as sharp and reliable, and the app is considered intuitive after the initial learning curve. The voice-recording feature — where your recorded message plays at each feeding — is a crowd favorite, with many owners reporting that their cats learn to come running when they hear it.
What verified reviewers commonly criticize: Portion consistency is the most frequent complaint; owners of very small or very large kibble report needing to calibrate carefully. Some users note that the motion-detection alerts can be overly sensitive out of the box. A smaller number of reviewers have experienced WiFi disconnections, though these are often resolved by improving signal strength or updating the app.
Who should buy this: Cat owners (or small-dog owners) who spend time away from home and want the peace of mind of both scheduled feeding and live video monitoring. It’s especially useful for multi-cat households where you want to visually confirm each cat is eating.

Quick-Reference Setup Checklist
Use this as a printable (or screenshot-able) checklist:
- [ ] Unbox and verify all components
- [ ] Wash bowl, tray, and hopper
- [ ] Fill hopper with dry kibble (2–15 mm diameter)
- [ ] Assemble hopper onto base, seat bowl and tray
- [ ] Plug in via USB-C adapter
- [ ] Download PETLIBRO app (iOS / Android)
- [ ] Create account and select correct device model
- [ ] Put feeder in pairing mode (blinking light)
- [ ] Scan QR code with feeder’s camera
- [ ] Confirm WiFi connection (solid light)
- [ ] Create pet profile
- [ ] Schedule meals (time + portion count)
- [ ] Run test portions and weigh with kitchen scale
- [ ] Open live camera view and verify video quality
- [ ] Configure motion alerts, notifications, and voice recording
- [ ] Set up low-food alerts
Final Tips for New Owners
- Introduce gradually. If your cat is skittish, leave the feeder unplugged for a day so they can sniff and investigate before the motor starts whirring.
- Keep the feeder on a hard, flat surface. Carpet can muffle the dispensing sound and cause slight instability.
- Update the app and firmware. PETLIBRO periodically pushes updates that improve connectivity and add features. Check the app settings for firmware updates after initial setup.
- Bookmark the PETLIBRO support page. Their online help center and in-app support chat are the fastest routes to troubleshooting if you hit a wall.
If you’re also setting up other smart gadgets alongside your new feeder, our Brother P-Touch Cube setup guide covers a similarly app-driven pairing process that might feel familiar.
How We Research
This guide was compiled by synthesizing PETLIBRO’s official product documentation, manufacturer specifications, and the app’s publicly available feature descriptions. We also analyzed patterns across hundreds of verified customer reviews on Amazon and expert coverage from pet-tech publications to identify the most common setup questions, praise points, and complaints. We have not personally tested, owned, or handled this product — our goal is to curate the most accurate and helpful information available so you can get your feeder running smoothly on day one.


Leave a Reply